Specific LT1 Swap Pictures...
This page contains pictures that I took of specific things relating to the LT1 swap.
There are close ups of certain things that have either been changed, or need to be made known about.
I tried to get as many pictures as I could, so I could give people a pretty good estimate of how much work is involved, and what all has to be done, etc.
Take a look at 'em (click the pictures to get a larger version), and if you've got any questions feel free to e-mail me, by means of my contact page or at eric_anderson99@hotmail.com.
Enjoy...
|
|
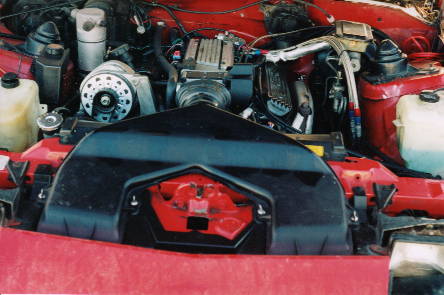
There it is...that's an LT1 in a 3rd Gen. Z.
The LT1 fits so nicely in the engine bay of a 3rd Gen. car. It's not near as difficult to work on or around in comparison to a 4th Gen. Hell...in a 3rd Gen. the engine is completely accessable, instead of being half-way tucked under the dash board.
We'll take a tour around the engine, from passenger side to driver side.
|
Passenger Side View Of Engine Bay
Notice how low the LT1 sits in the car. For that reason, amongst a few others, a '91-'92 Speed Density Bellows is required. It's long enough to reach the TB from the air intake housing, unlike anyother stock piece. It's very flexible and easy to work with.
No clearance problems height-wise...for sure not.
|
|
|
|
Passenger Side Front Of Engine Bay
This shows the passenger side of the engine compartment. As you can see I didn't have the A/C hooked up in this picture. It was all set to accept it, but I didn't go through with it at the time of install.
The green bundled wire in the back of the engine is the wire for the A/C. But having done the swap again, I chose to not install the A/C. |
Driver Side Engine Bay Close Up
This shot shows the braided fuel lines that I'm using, and the -6AN fittings connected to the Adjustable Fuel Pressure Regulator (AFPR). Those lines are great, expensive, but very worth it, and so are the -6AN fittings. They're very nice to work with and to have.
|
|
|
|
Driver Side View Of Engine Bay
Another shot showing how low the engine sits, as well as the amount of distance between the front of the engine and the back of the fans. |
AFPR And Braided Fuel Line
Just like in the other picture...the only thing regarding the -6AN stuff is that you've gotta weld one onto the return line, on the fuel rail, and onto the braided lines as well.
Securing them onto the AFPR requires a small adapter that screws into both ends, AFPR and fuel line. Very nice stuff! |
|
|
|
Fabricated Throttle Cable Plate
A special throttle cable was needed, so I had to fabricate a plate to mount to the firewall, with accomidations for the different sized cable.
I attached it to the firewall with rivets. |
Fabricated Throttle Cable Bracket
When using the LT1's throttle body a different throttle cable bracket was needed. I had to make one that would attach to the manifold, would accept the 3rd Gen.'s throttle cable, and would work with the throttle cable cover, too. I think it turned out quite well. |
|
|
|
Air Intake Set-Up
This picture shows how I implemented the use of a 2.8 liter Camaro air filter housing and a '91-'92 Speed Density air bellows.
The 2.8 liter Camaro housing works out perfectly for me! Not everyone needs or has to use one of these, but since I wanted to run a '93 PCM (Speed Density) I wouldn't be using a Mass Air Flow Sensor (MAF), and since the '91-'92 bellows don't have a provision for the Intake Air Temperature Sensor (IAT), the 2.8 piece worked perfectly.
Not only did the fact that it had what I needed, where I needed it, but it also provided as an already done "mod". Relocating the IAT to a place further from the engine is very common, and having it in the housing works perfectly for that. |
2.8 Liter Camaro Air Filter Housing and Modified 4th Gen. Radiator Cover
Since I had to use a 4th Gen. radiator, I wasn't able to use my 3rd Gen. radiator cover. The 4th Gen. radiators aren't as wide and because of that I had to modify a radiator cover to work with it.
The picture shows how I cut the cover, and then attached it back together using rivets. It works quite well, and in person you can't really even tell it's there, unless you look close. With the 2nd swap, I thought more about it and made the cut in the center of it, so the cut and the rivets are under the air box. So now you can't see it and it looks better.
You can also see the IAT in the 2.8 housing. |
|
|
|
4th Gen. Dual Fan And Radiator Set-Up
Due to the high cooling demands of the reverse cooled LT1, I had to use a 4th Gen. radiator and dual electric fan set-up. It works VERY nice.
If you're not familiar with the 4th Gen. set-up, you'll notice that the fans are attached to the radiator, by a few clips. It's very nice.
Nice and compact, and very able. |
Air Conditioning Plumbing And Connections
This is sort of a vague picture, but you can see the connections for the A/C as well as some radiator hoses, etc.
Since I didn't hook the A/C up when I installed it, I don't have the actual A/C lines running to the compressor or anything like that. I've received many many requests for info regarding custom A/C lines, only to not be able to give any assistance, since I haven't done it and haven't really looked too far into having it done either.
All I can say is that it'll be expensive. It's a very tight fit between the passenger side motor mount and the back of the A/C compressor, where the lines connect. You can see what I'm talking about in the picture featuring the passenger side motor mount. |
|
|
|
Relocated Passenger Side Motor Mount And Air Conditioning Compressor
Doing this was a real headache! This very picture is why I recommend to almost everyone that they not install an LT1 using F-Body accessories if they want to run A/C. Wanting to keep myself cool during the summer, cost me a lot of time and money.
I spent lots of time measuring, locating, testing everything for the right fit. I had to cut the motor mount off and relocate it back an inch or so, and had to pound the frame a little bit as well. All of that just so the A/C compressor would fit with lines attached to the back of it. Not worth it, in my opinion.
After having done the swap a 2nd time, I am no longer running A/C and instead am using a 1LE A/C delete pulley. Doing this makes it a lot easier to install the LT1, as you don't have to move or modify the motor mounts or anything to make it fit properly. I like it better this way anyway... |
Power Steering Resevoir
This is another thing that I've received lots of questions about. As you can see I chose to mount a 4th Gen. power steering resevoir on the passenger side inner fenderwell. It fits quite well, and looks good too.
|
|


